

Walkthroughs
A walkthrough takes a client through your documents one step at a time, from one link: for example a proposal, then an engagement letter, then a consent, with short pages of your own words before, between, and after them. It can also be a single document, such as a proposal between a welcome page and a thank-you page. This page covers building a walkthrough, sending one, and what your client sees.
Before you start
- Walkthroughs is a plan feature. If you don't see Walkthroughs in the menu, it isn't on your plan yet. The Walkthroughs page explains what walkthroughs do and that they're not on your plan.
- Each document in a walkthrough comes from a published template: a proposal template (see Templates), and an agreement or consent (see Documents).
- Sending needs a verified email sender, as for any proposal (see Settings).
Build a walkthrough
- Click Walkthroughs in the menu.
- Type a name under New walkthrough name (for example "New client onboarding") and click New walkthrough.
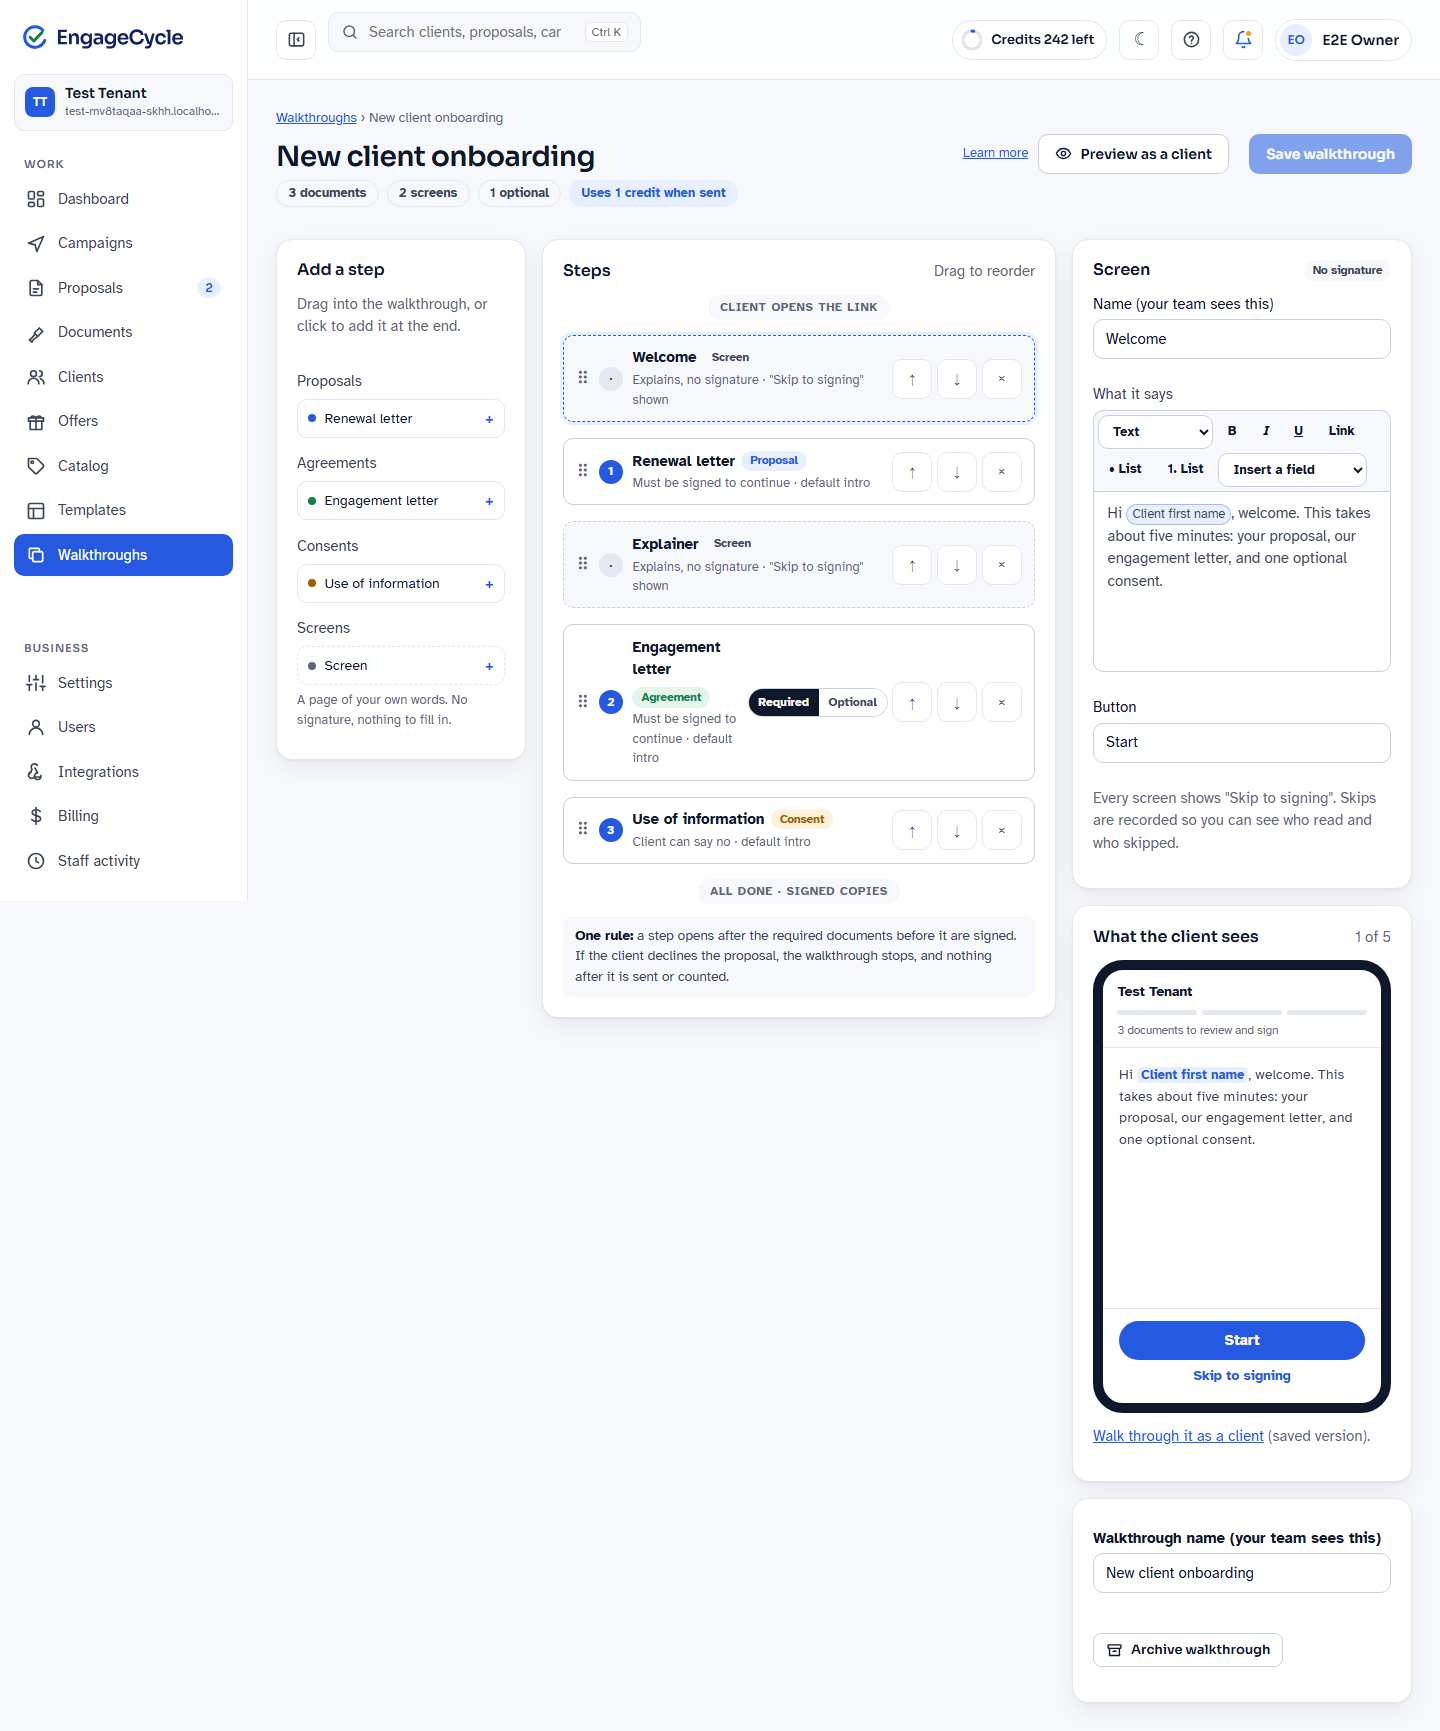
- In the builder, drag a template or a Screen from the left into Walkthrough steps, or click one to add it at the end. A walkthrough needs at least one document and can have up to 12 steps.
- Click a step to change it on the right:
- A proposal is always required. Its services and prices are set when you send it, for that client.
- An agreement can be Must be signed to continue or Client can say no.
- A consent is always optional: the client can sign it or say No thanks.
- A Screen is a page of your own words, with a button the client clicks to go on. You can Insert a field, such as the client's first name or your business name.
- Drag steps (or use Move up and Move down) to put them in order.
- Click Save walkthrough.
Before each document, the client sees a short intro, unless a screen of yours is right in front of it. Each document's intro is Default (wording that fits most businesses), My own words, or off. Turn off default intros turns them all off at once.
Preview it
Click Preview as a client to go through the walkthrough as a sample client would: every screen, intro, and document, then the All done page. Nothing is sent and nothing can be signed in a preview.
Send a walkthrough to a client
- Open the client and click Send a walkthrough.
- Choose the walkthrough and click Start this walkthrough. If you already started this walkthrough for this client and haven't sent it, you're taken to that draft instead ("You already have a draft of this walkthrough"), so a client never has two.
- If the walkthrough has a proposal and you've already started a proposal draft for this client, choose Use a draft you've started (each one shows when you started it, its packages, and its total) or Start a new proposal, then click Start this walkthrough.
- Click Choose what's in it beside the proposal to open the builder, and set the proposal's services and prices, as for any proposal (see Proposals).
- Click Preview and send to see the whole walkthrough with this client's details. Every document shares one response date.
- Choose Send link to email the client their walkthrough link, or Create link to copy it and share it yourself.
A draft you use keeps its services, prices, discounts, signers, and copied people, and takes the walkthrough's response date. Any preview you made of it on its own no longer counts, so preview the walkthrough before you send it. It still uses one credit for the whole walkthrough. Only drafts that aren't part of another walkthrough are offered; proposals you've already sent never are.
Delete this draft on an unsent walkthrough deletes the walkthrough and the documents it made. A proposal draft you added from your drafts isn't deleted: it goes back to your drafts with its services, prices, and people. Preview it again before you send it on its own.
The sent walkthrough's page shows each document's status, Copy walkthrough link, Send the walkthrough link again, Extend deadline, Withdraw walkthrough, and, once something is signed, Download all (ZIP).
What your client sees
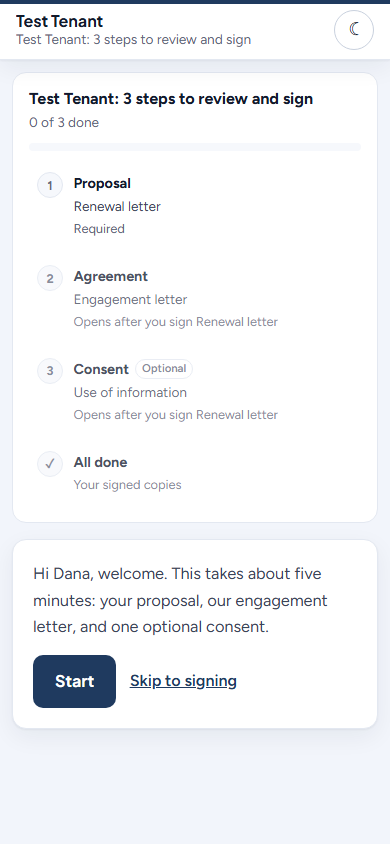
- They open one link. At the top: your business name and how many steps there are, for example "Northwind Services: 3 steps to review and sign".
- Each step comes in order: your screens, a short intro, then the document to sign.
- A list of the documents stays beside the page (at the top on a phone), showing what's signed and what's next.
- On a screen or an intro, Skip to signing takes them straight to the next document.
- A required document must be signed before they can go on. Declining a required document stops the walkthrough; the documents after it aren't sent.
- When everything is answered, they see any closing screen of yours, then All done with Your signed copies and Download all (ZIP). Each document also has its own PDF and certificate, emailed as usual.
If a document has more than one signer, each signer gets their own walkthrough link and signs in the order you set (see Signers and copied people).
Send a walkthrough in a campaign
A campaign can send a walkthrough that has a proposal in it.
- In the campaign's Template step, choose the walkthrough under Send it as a walkthrough and click Use it. The campaign's template becomes the walkthrough's proposal.
- Preview a client: you see their whole walkthrough. Mark This looks right, look through Review, then schedule, as for any campaign (see Campaigns).
Each batch sends whole walkthroughs. A client with an open walkthrough that has a proposal in it is left out, like a client with an open proposal.
Good to know
- One credit per walkthrough, however many documents are in it. Releasing later steps, extra signers, reminders, and sending the link again don't use another. A walkthrough withdrawn before anyone opened its link gets its credit back. See What's a credit?.
- Documents in a walkthrough are managed from the walkthrough. Their own links, resend, revise, and withdraw are turned off; use the walkthrough's page instead.
- Reminders and expiry work for the whole walkthrough: the reminder carries the walkthrough link, and the walkthrough ends on its date. If every required document was signed by then, it ends completed.
- More time: while a walkthrough is open, click Extend deadline on its page to give the client more time. Every open document, and each one not reached yet, gets the new date, and the walkthrough link keeps working. Each document still shows the date it was sent with, with a note above it about the new date. An expired walkthrough can't be extended: send it again. See Give a client more time.
- Changing a walkthrough doesn't change walkthroughs already sent. While a scheduled campaign still has walkthroughs of it to send, its steps can't change.
- Who read and who skipped: the sent walkthrough's page shows which screens and intros the client opened, and which they skipped.
- Signed documents in a walkthrough send their usual events to your integrations, with the walkthrough's id added (the
packet_idfield). See Integrations.